Monday, May 30, 2016

Remembering the Fallen


This is an image from Cute as a Button and its called fallen soldier. You can find the shop and the image by clicking on the links above. I started out by painting the image. I used the Stitched Rectangle Die Set to cut the image, red and white cardstock. The Blue cardstock is 4 1/4 " x 5 1/2" The card is a tan card stock and it's 5" x  7". I added some embellishments I purchased from the local craft store.

Thursday, May 26, 2016

May Inspiration by Judy


Hey everyone!
It's Judy here sharing my inspiration post for May.

I haven't made a baby card in a while and Francesca has
some great digis for a baby theme, so I chose to use
Baby Bear Buttons.


I gathered my materials.
I started by printing the image twice and coloring one of them.
I used a 12x12 piece of solid colored card stock,
circle and square cutting dies, an embossing folder and some ribbon.

The card stock was cut in half to create a 6x6 square card base.
I adhered a piece of white card stock.

I fussy cut the colored image.
I die cut the circles and embossed the white one.
The uncolored image was cut with a square die and matted.

I took the colored image and popped it on top of the uncolored die
and matted the embossed circle die cut.
The ribbon was adhered to a strip of colored card stock.

All the pieces were arranged and adhered to the card base.
I added the buttons and a bow to finish off.


I hope you'll check out this digi and all the other
products available at

And, we'd love to see you join us for the monthly challenge at the

You can also find more inspiration at the

Until next time
Happy Crafting!

Sunday, May 22, 2016

Dianne's Inspiration for May

Hi 

Dianne here today with first showcase post 
for 
Cute As A Button 

The image i have used is 

'BUTTON LOVE' 


First i gather my card stock ,DP and embellishments 


White card size 5-1/2 "x 5-1/2"
Pink and Mustard cut to size 
Cut DP to size as well 
Used Die'sire button embossing folder 

Then i coloured the image using my promarker's 


Hair-Burnt Sienna -Cocoa
Skin- Coral-Sunkissed Pink-Blush-Baby Pink 
Clothes -Azure-Sky Blue 
Yellow-Sunflower-Cocktail Pink-Baby Pink 
Orchid-Vanilla 


Then i just put everything together to make my card 
i did change the Buttons from the orginal ones to 
the flower buttons i have used 
Here is my card finished 


Hope you like what i have made today 

Here are some links for you


Thank you 

Dianne xx

Friday, May 20, 2016

May inspiration by Nicky


Here is my inspiration for you today. Its a cute girly card. I hope you all like it :)


 I made this card using the 'Button Love' image from Cute As A Button. Find it at the shop link below.


Here are some step by step instructions of how I made the card.

First I coloured the image. I wanted it to be colourful so selected my usual colours for skin and hair then added a good mix of colours.

Then I chose some matching paper and a card blank that matched the size of the image. I chose the striped patterned paper and a matching purple 5"x7" card blank.

I used the following Promarkers:

Clothes and bow - Cornflower, China Blue, Pastel Blue, Pale Pink and Dusky Rose.
Buttons and flowers - Yellow, Bright Orange, Grass, Sky Blue, Amythest and Honeycomb.
Hair - Sandstone and Cinnamon.
Sack - Cinnamon, Caramel, Tan, Sandstone and Vanilla.
Heart - Lipstick Red

I used the following Copics:
Skin - E11, E21, E00, E000.


I cut the image to a suitable sizeto fit the card blank. I mounted the patterned paper onto the card blank, measuring 6mm smaller than the card blank on both sides. I attached it with double sided tape.

I mounted the image onto the paper with foam tape.

To finish I cut out a LOTV sentiment to add to the bottom RH corner and added matching coloured gems in each corner.


Here are some links for you:


Thanks for reading and 
x HAPPY CRAFTING EVERYONE x

Sunday, May 15, 2016

May Inspiration by Lau

Hello !

It's Lau ! I want to share a card with you today. I made it with the digital stamp "Peace" you can find in the store HERE and the papers come from the store too : "Cruella Dark Elegance" you can find HERE.
Hope you like it ! xx

So, my cappuccino is ready....My papers too...Go !


I cut a part of the black paper with a Nellie's die (oval)


I prepare the design of my card


I use Promarkers for my colouring


I add some half pearls, and Tadaaaa, my card is ready !!!


I hope I have inspired you. Feel free to join us on Facebook to share your projects, it's here : https://www.facebook.com/groups/CuteAsAButtonDigiStamps/


Have a great day dear Crafters ! xx

Wednesday, May 11, 2016

Happy Mother's Day....Love Button's

Hi Everyone!! How Are You today? It has been so much fun watching my perennials come up and get ready to start blooming. I can't wait to start planting. We have to wait until around Mother's Day before we can start planting because we still have frost at night and the chance of snow. I have been busy planning what I want to add to the flower beds this year. I add a few new perennials every year. The garden is so pretty mid summer with everything blooming and it brings in the butterflies, too!

I have a card I made for some inspiration. I used the "Buttons" image from Cute As A Button. She is just adorable with her wavy hair and big bow. The Cute As A Button May Inspiration image I used worked perfect for a Mother's Day Card. Here is my Card.


I used Prisma Color Pencils to color the image. I added Stickles to the center of the flowers some of the button's and the trim on her pants. 
I used a button's embossing folder on cream cardstock and used Stickles on the center of the button holes.
I added random button's across the edge of the embossing piece for a more finished look. Then I tied a knot through the button holes of the flower shaped button and adhered it to the center of the bag. 
The Sentiment is a clear stamp from my stash supplies. The finished card is a 5" x 7".
I hope you have enjoyed my card and it has inspired you to create something awesome! Hugz

Margaret's Inspiration post

My turn to do the Inspiration post for Cute as a Button

I have made a very simple card easy for beginners
I have printed Cute as a button precoloured digi stamp Amirayah Xbox gamer (you can buy her as a black and white digi for you to colour)  and layered her onto Cute as a Button paper from blue elegance paper set.
Added sentiment from Ginger's House blog and brads from Digital Scapbooking Studio.

You can buy the lovely Cute as a button stamps at
http://cute-as-a-button-stamps.myshopify.com/

and I hope you will go to the challenge blog and join in the May challenge
http://cuteasabuttonchallenge.blogspot.com.au/2016/05/welcome-to-challenge-22-anything-goes.html

We also invite you to join the facebook group
https://www.facebook.com/groups/CuteAsAButtonDigiStamps/


Friday, May 6, 2016

Fishers Of Men Shadow Box Card and Template

Hello!  It's Karen (busybusyhoneybee) here!  It is my turn to inspire you again!!  I do hope this will inspire!  I love making these!!
 
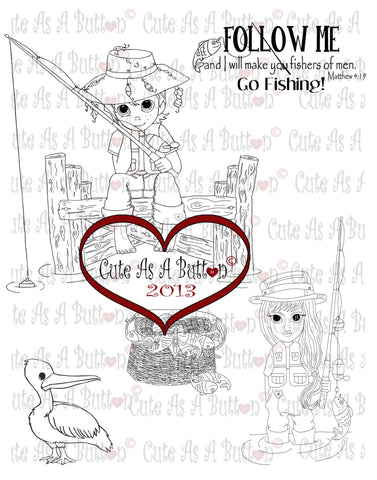
Have you seen this fun Fisher Set?

IMG00016 I Will Make You Fishers of Men - Bible Journaling Bookmark Digital Digi Stamp

This is called I Will Make You Fishers of Men.  For my card I used all of the images in the set.  I placed the bird on the fence and the basket outside the shadow box. 

To make this shadow box you need two of the following (use this template):
Take your top piece and using a die (or fussy cut) cut a hole out of the center.  It doesn't have to be round...  I like to try to reinforce my cut by using cookie cutter dies and layering over it.  Makes it a bit stronger.  Place your focus image on the inside.  Adhere the front to the back and have fun decorating.  This should fit into a square envelope if you fold the scorelines to the inside.

It was my goal to make it look like the two kids were fishing in a pond under a big tree, that is why I have the leaves all over the top.  The images were colored using chalk and ink.  I added some Crystal Stickles over the fish to give them the 'rainbow trout' look, and added some Glossy Accents over the kids' eyes.


Thanks for looking!  I can't wait to see your shadowboxes!!  :)

Hugs,
Karen C