Showing posts with label #designerinspiration. Show all posts

Tuesday, July 26, 2022

July Designer Inspiration - Judy

Hello there!
It''s Judy here with my inspiration project for July.

 I have created a slimline card using


I like that this digi set has several images that can be used
individually or in combination.

I colored the digi I used with Prismacolor Pencils and fussy cut.
My background was done with cloud and grass stencils from newton's Nook.
The sentiment was die cut using 2 different dies that I combined.

As Always we would love to see you in our FaceBook Group 
and have you visit the store. Click on the links below.


Sunday, December 26, 2021

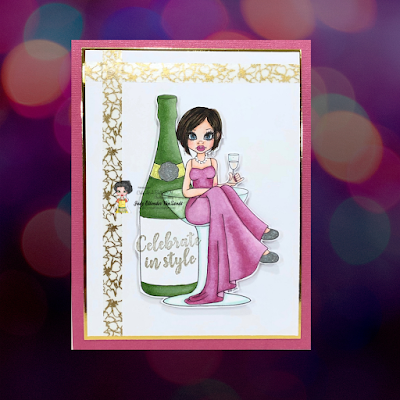
December Designer Inspiration - Judy

Hi there!
It's Judy here with my December inspiration project.

It is a pretty quick and easy card design using


I colored the digi  with Copics and glitter gel pens.
I stamped the sentiment.
My card uses specialty pink and gold card stocks.
I added washi tape to the white background, fussy cut the image and
adhered with foam tape.


I hope you are having a great holiday season and
are looking forward to the New Year!


Tuesday, October 26, 2021

October Designer Inspiration - Judy

Hi there!
It's Judy here with my inspiration project for this month.

I created a card with simple design using


 I colored this sweet digi with Copics and fussy cut.
The background is the A2 size white card.
I added a solid strip of card stock and a piece of patterned paper.
These were scraps I had on my desk.
The sentiment and corner swirls are dazzles stickers from Paper Wishes.
This was really quick and easy to put together.


As always we would love to see you our Facebook Group and 
have you visit the store.
Follow the links below!


Wednesday, May 26, 2021

May Designer Inspiration - Judy

Hi there!
It's Judy here with my inspiration for May! 

Since it is Mer-May I thought I would create a card
using one of Francesca's beautiful mermaids!


I colored the digi with Spectrum Noir & Arteza markers.
A little glitter glue was added.
I die cut the image with scallop circle dies.
The die cut was added to a 5 1/2 x 8 1/2 inch card base.
A patterned paper was added to the base.
I punched borders with a Fiskars Bubble Border punch.
The sentiment was die cut with Impression Obsession dies.
I added some dimensional stickers from my stash.


I hope you'll check this digi and all the 
other products available at
And, don't forget to join us each month for the Blog Challenge
and the Monthly Progressive Challenge over in the


Friday, March 26, 2021

March Designer Inspiration - Judy

Hello there!
I'm sharing my inspiration project for the month of March.
It is a card I created using


I colored the image with Copic and Arteza Everblend Markers.
It was fussy cut and added on to a layered die cut oval.
I die cut the top of the background piece with a 
Crafters' Companion Create a Card Die.
The sentiment was die cut using 
Impression Obsession Greetings Set Dies.
I added washout tape near the bottom of the card and gems.


I hope you'll check this digi and all the 
other products available at
And, don't forget to join us each month for the Blog Challenge
and the Monthly Progressive Challenge over in the


Wednesday, October 28, 2020

October Inspiration - Judy

Hello there!
It's Judy here sharing my inspiration project for this month.

It is a card that can be given for any occasion.

I used on elf my favorite stamps,


I colored the image with Prismacolor Pencils and fussy cut.
I die cut the background in silver matte metallic card stock.
The die cut is matted with black glitter card.
I die cut the "Fabulous" sentiment in black glitter card
and adhered to the silver card.
It was quick and easy to put together!


I hope I've provided you some inspiration and that you'll
check out theis and the other products available at

And, don't forget to join us each month for the Blog Challenge

Wednesday, August 26, 2020

August Designer Inspiration - Judy

Hi there!

It's Judy here with some inspiration for

Cute As A Button .

I've created a card

using School Books


I colored the digital with Prismacolor Premier Pencils.

My DP is from a Colorbok paper pad.

The stickers were found at Dollar Tree.

I hope you like my project and
 that you'll check out this stamp
along with all the other  products available at

And, don't forget to join us each month for the Blog Challenge


Monday, July 27, 2020

July Designer Inspiration - Judy

Hello there!
It's Judy here sharing an art journal page using


I colored the image with Spectrum Noir Markers and fussy cut.
I inked the background of my journal page
to create the background for the digi.
The flowers on the corners were due cut and colored
with markers. I cut 4 strips of card stock to create a frame.
The quote was stamped.


I hope you like my project and
 that you'll check out this stamp
along with all the other  products available at

And, don't forget to join us each month for the Blog Challenge

Friday, June 26, 2020

June Designer Inspiration - Judy

Hello there!
It's Judy here with my inspiration project for this month.

I've created an altered frame using


I started by coloring the image with Prismacolor Premier Pencils and fussy cutting.
I took a small wood frame from Michaels and traced it
on to the backside of the DP and cut.
Next the paper was decoupaged to the frame front.
I die cut layered ovals for the image backing and adhered
to the frame opening. I added daisies that were die cut and rolled,
a black bow created with ribbon and a title out of dazzles stickers.


Altering frames is one of my favorite things to craft
and love the way this one turned out.


I hope you like my project and
 that you'll check out this stamp
along with all the other  products available at

And, don't forget to join us each month for the Blog Challenge


Wednesday, February 26, 2020

February Designer Inspiration - Judy

Hey there!
It's Judy here with a quick and easy 
card project to share with you using


I colored the image with Prismacolor Premier Pencils and fussy cut.
I added some glitter glue to the wings.
I dry embossed my 5 x 6.5 inch white card base.
I die cut a frame and popped the image on to it.
The frame was adhered to the card base.
Quick and easy and will work for many occasions.

I hope you like my project and
 that you'll check out this stamp
along with all the other  products available at

And, don't forget to join us each month for the Blog Challenge

Friday, December 27, 2019

December Designer Inspiration - Judy

Hey there!
It's Judy here sharing a card project.


This year is winding down so
I thought I would create a New Year's card.


I colored the image with Spectrum Noir Markers and
glitter gels pens. I trimmed the image in to a rectangle,
rounded the corners and layered on top of a Gemini die cut frame.
The sentiment is sticker from Paper Wishes.


I hope you like my project and
 that you'll check out this stamp
along with all the other  products available at

And, don't forget to join us each month for the Blog Challenge

Saturday, September 28, 2019

September Inspiration - Judy

Hi there!
It's Judy here
sharing this altered frame I created using
the Scarecrow image from the


I colored the image with Prismacolor Premier Pencils and fussy cut.
The background paper from my stash
was decoupaged onto a wood frame.
I used square Gemni dies to create a frame around the opening.
I found the quote on the internet and generated on the computer.
The sunflowers are layered stickers from Recollections.


As I've said before, I love these Wizard of Oz digis and
 hope you'll check them out
along with all the other  products available at
And, we hope you'll join us each month for the Blog Challenge

Tuesday, August 20, 2019

August Designer Inspiration - Judy

Hi there!
It's Judy here sharing an altered frame project.
I used the Dorothy image from the


I printed the image, colored with Prismacolor Premier Pencils and fussy cut.
I found a patterned paper in my stash to use as the background.
I used the frame as a template to cut out the patterned paper.
Next I painted the back and edges of the frame in
a coordinating acrylic paint.
The next step is to decoupage the pattern paper to the frame front.


I found a quote I liked to fit my theme and sized it to
fit the frame opening.
I had layered poppy stickers from Recollections in my stash
which worked great as embellishments.
Added a bow and the image.


I love these Wizard of Oz digis and hope you'll check them out
along with all the other  products available at
And, we hope you'll join us each month for the Blog Challenge

Until next time,
Happy Crafting!